Small House Plan Objectives and Instructions:
Open your metric title block template and SAVEAS: Lastnamehouseplan.dwg
1. Setup UNITS to Architectural, Precision = 1/16", Units to scale inserted content = Inches
2. LIMITS (60',50')
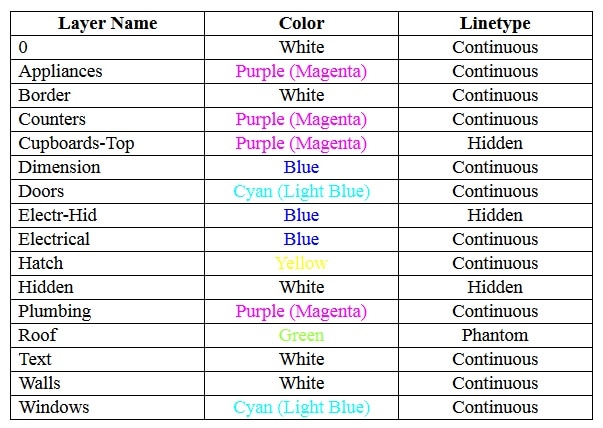
3. Set up new Architectural Layers
4. Set up TEXTSTYLE (Choose a Font like Arial, Veranda, City Blueprint, etc.)
5. Set up DIMSTYLE from the annotation pull down
- New - Call the new dimstyle "archdim"
- Baseline spacing = 1'
- Extend beyond dim lines = 6"
- Offset from origin = 3"
- Arrow Style = Architectural Tick
- Arrow Size = 6"
- Dimension Break = 2"
- Text Style = Arial or your choice
- Text Size = 6"
- Offset from dim line = 1"
- Text Placement - Vertical: ABOVE
- Text Alignment = Aligned with dimension line
- Fit = Either text or arrows (best fit)
- Text Placement = Over dimension line, with leader
- Unit Format = Architectural
- Precision = 1/16"
- Decimal Separator = Period
6. WALLS
7. WINDOWS and DOORS
5. Set up DIMSTYLE from the annotation pull down
- New - Call the new dimstyle "archdim"
- Baseline spacing = 1'
- Extend beyond dim lines = 6"
- Offset from origin = 3"
- Arrow Style = Architectural Tick
- Arrow Size = 6"
- Dimension Break = 2"
- Text Style = Arial or your choice
- Text Size = 6"
- Offset from dim line = 1"
- Text Placement - Vertical: ABOVE
- Text Alignment = Aligned with dimension line
- Fit = Either text or arrows (best fit)
- Text Placement = Over dimension line, with leader
- Unit Format = Architectural
- Precision = 1/16"
- Decimal Separator = Period
6. WALLS
- Change if necessary to the WALLS layer, then start drawing your walls as follows:
- Draw using the LINE command for the outside of the exterior walls.
- Using the OFFSET command offset the outside line inwards 6” for the wall thickness.
- Using the OFFSET or COPY commands:
- Offset or copy the outside lines into the center position for the interior walls.
- Then offset these over 2” on both sides for interior wall thickness of 4”.
- Erase the centerlines of interior walls.
- Use the TRIM command and trim the walls to size.
- Closets
- Copy the back wall of the closets forward 16” for a closet shelf, then copy this line back 2” for a closet rod.
- Change the rod to the HIDDEN layer
7. WINDOWS and DOORS
- Change to the WINDOWS or DOORS layer.
- Insert Doors and Windows
- Select INSERT, as you did for your BORDER, and go to I:\ drive then DRAFTING\ACADHOME\DOORS or WINDOWS and select the appropriate object.
- NOTE: Outside doors or windows must be accurately located, as they will be dimensioned to.
- Insert them at the end of the appropriate wall then move them into position using coordinate entry.
- NOTE: Inside doors and closet doors will NOT be dimension to.
- Insert them at the end of the proper wall then move them over 4” for a door or center them if a closet door.
