Metric Title Block Objectives and Instructions:
1. Setup UNITS to metric in mm
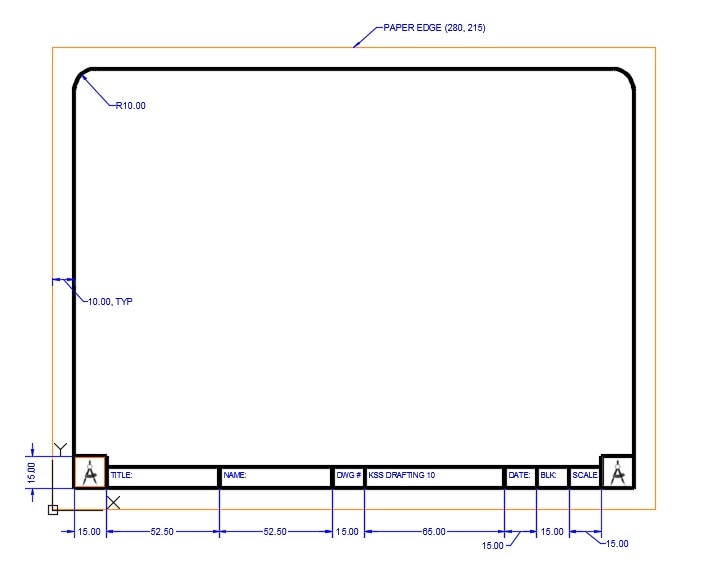
2. LIMITS (280,215) * This is the size of a letter piece of paper
3. Set up Layers
- Object
- Hidden
- Text
- Dimension
- Viewport *Ensure it will not print
- Center
- Border
4. Set up TEXTSTYLE (Choose a Font like Arial, Veranda, etc.)
5. Set up DIMSTYLE
- Baseline spacing = 10mm
- Extend beyond dim lines = 3mm
- Offset from origin = 1mm
- Arrow Size = 3mm
- Dimension Break = 2mm
- Text Style = Arial
- Text Size = 3mm
- Offset from dim line = 1mm
- Text Alignment = ISO standard
- Fit = Either text or arrows (best fit)
- Text Placement = Over dimension line, with leader
- Unit Format = Decimal
- Precision = 0.00
- Decimal Separator = Period
6. Create drawing using POLAR CO-ORDINATE ENTRY
7. Use the dimensions from above and commands such as:
Line, Offset, PEDIT, Fillet,
8. Set up Layout Space and Printing standards
9. MVIEW a viewport on paper space
10. Create a custom paper space scale of 1:1.5 and set drawing
11. Saveas: LASTNAMEMETRICTITLEBLOCK.dwg
12. NOTE!!!: This title block will be your template to base all your Metric drawings from for all levels (A, B, & C)
1. Setup UNITS to metric in mm
2. LIMITS (280,215) * This is the size of a letter piece of paper
3. Set up Layers
- Object
- Hidden
- Text
- Dimension
- Viewport *Ensure it will not print
- Center
- Border
4. Set up TEXTSTYLE (Choose a Font like Arial, Veranda, etc.)
5. Set up DIMSTYLE
- Baseline spacing = 10mm
- Extend beyond dim lines = 3mm
- Offset from origin = 1mm
- Arrow Size = 3mm
- Dimension Break = 2mm
- Text Style = Arial
- Text Size = 3mm
- Offset from dim line = 1mm
- Text Alignment = ISO standard
- Fit = Either text or arrows (best fit)
- Text Placement = Over dimension line, with leader
- Unit Format = Decimal
- Precision = 0.00
- Decimal Separator = Period
6. Create drawing using POLAR CO-ORDINATE ENTRY
7. Use the dimensions from above and commands such as:
Line, Offset, PEDIT, Fillet,
8. Set up Layout Space and Printing standards
9. MVIEW a viewport on paper space
10. Create a custom paper space scale of 1:1.5 and set drawing
11. Saveas: LASTNAMEMETRICTITLEBLOCK.dwg
12. NOTE!!!: This title block will be your template to base all your Metric drawings from for all levels (A, B, & C)
NOTE!!!: Every drafts-person approaches a drawing differently. Just because someone does it one way, doesn't mean it's the only way to complete a drawing. The instructions are there to help but you don't have to draft in that EXACT way. Just ensure that all dimensions are correct!
