- Dimensioning in CAD
- Change to the DIMENSION layer.
- Draw a temporary line on the ends of the Interior walls that touch the outside wall so you can osnap to the center of these walls -- erase after dimensioning.
- NOTE: You could put these lines on a new layer and then just turn this layer off and the lines will disappear and not be plotted or printed.
- Make sure your text size is 6”.
- The 1st dimension should be 48” (or 4’) away and then 12” (or 1’) thereafter.
- Use "Continue" and Baseline dimensioning to speed up the process. Located under the Annotate panel.
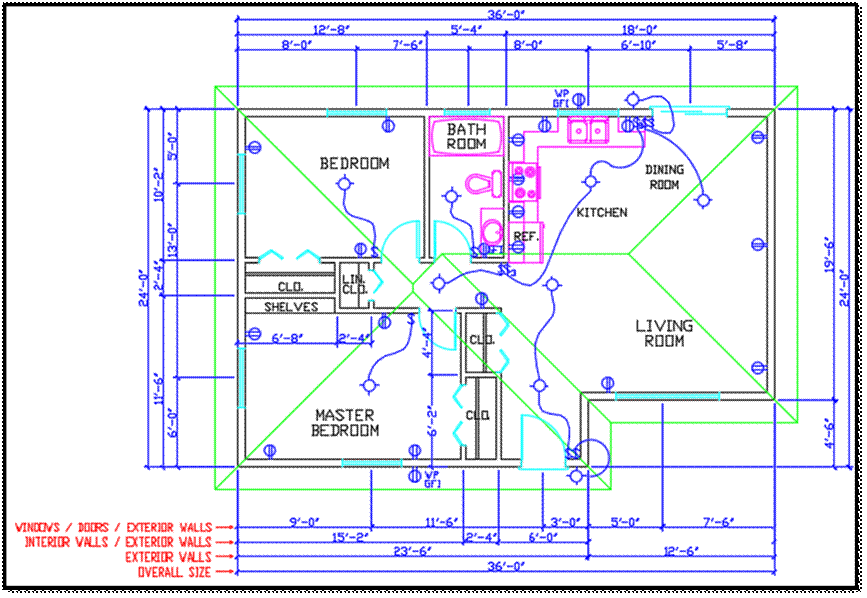
- Dimensions - outside *** Numbers read from bottom and right side ***
- 1st dimension line - center of windows/doors and to outside of exterior walls
- 2nd dimension line - center of interior walls and to outside of exterior walls
- 3rd dimension line - outside of exterior walls
- 4th dimension line - overall size (outside to outside of furthest exterior walls)
- Dimensions - interior *** Do not dimension to interior doors ***
- Horizontal and vertical dimension line(s) to pick up any interior walls not dimensioned outside
ROOM NOTATION (Back to Contents)
- With a text size of 6” – 8” using all capital letters type in the names of each room and closet (LIVING ROOM, DINING ROOM, KITCHEN, BATH ROOM, MASTER BEDROOM, BEDROOM, ENTRY, CLOSET, LINEN, ETC.)
- Note: Keep similar areas with the same text size such as room names (8”) or closets (6”).
